
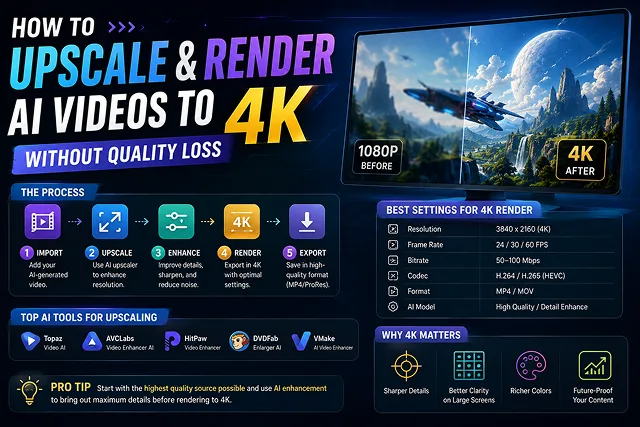
Getting AI-generated videos (such as from Kling, Runway, Google Veo, or Wan 2.2) up to 4K resolution is not a matter of just exporting them at a resolution of 3840 x 2190. The conventional bi-cubic upscaling increases the size of the pixels which leads to blurring, ringing artifacts, and compression noise in videos.
To produce clear 4K videos that are of good quality, you will have to use Generative Tensor Upscaling techniques, suitable AI enhancement software like those developed by Topaz Video AI, Astra, and Video2X, and the uncompressed video container codecs.
Above-the-Fold Breakdown: Traditional Upscaling vs. AI Spatial Tensor Upscaling
Upscaling Optimization Matrix · Traditional Algorithms vs. Neural Tensor Upscaling
| Upscaling Metric | Traditional Bicubic / Bilinear Upscaling | AI Tensor Upscaling & Frame Enhancement |
|---|---|---|
| Pixel Reconstruction | Stretches existing pixels (Causes blurriness & halos) | Resynthesizes lost micro-details (Skin pores, fabric, hair) |
| Artifact Suppression | Amplifies diffusion noise and compression blockiness | Removes JPEG blockiness & temporal flicker |
| Edge Sharpness | Creates harsh, jagged edge lines | Preserves vector-smooth edge anti-aliasing |
| Frame Interpolation | Limited to source frame rate (24fps) | Smooths motion to native 60fps via AI interpolation |
| Processing Requirements | Standard CPU-based rendering | Tensor GPU Acceleration or Cloud Neural Upscalers |
1. The 4-Step Technical Pipeline: 720p to 4K Master
This is a 4-step rendering pipeline to avoid "waxy skin" artifacts or overly sharpened halos, which is:
[Raw AI Video (720p/1080p)] ➔ [Step 1: Artifact Denoise Pass] ➔ [Step 2: AI Generative Upscale]
│
▼
[4K ProRes/DNxHR Master] [Step 4: Master Codec Export] [Step 3: Optical Flow Frame Interpolation]
Step 1: Pre-Denoise & Compression Cleanup
- AI videos commonly contain a small amount of compression block artifacts or noise due to cloud rendering. If you plug these directly in an upsclaer the AI will make those compression artifacts or noise look even worse. Apply a shallow De-block and De-noise filter to the clips first before running theupscaler (e. G: Set topas proteus/Iris noise reduction to 15% – 20%).
Step 2: Spatial Tensor Upscaling
Run the cleaned video through a generative spatial model:
- For Photorealistic AI Footage: AI Footages (Realistic Photorealism) Choose the models you train on photo geometry (e. G. Topaz Iris, Astra). Use Relative Sharpening to +15 and recover detail to +25.
- For 3D / Anime / Graphic AI Footage: AI Footages (3D / Anime / Graphic) Real-ESRGAN or Anime4K may be used.
Step 3. Temporal Smoothing (Optical Flow Frame Interpolation)
- MostAI generators output video at relatively low frame rates (24 or 25 FPS) to give a smooth result with slower camera movements. By applying optical flow based frame interpolation, you can generate new interpolated frames between your original frames and speed up the video to 60 FPS.
Step 4: Master Codec Selection (Exporting Without Loss)
Do not export from upscaling to a low-bitrate $H.264$ file. A low bit-rate and newly created 4K pixels cannot sustain detail. Export your render using professional master codecs:
- ProRes 422 HQ or ProRes 44 (macOS / Cross-platform NLEs)
- DNxHR HQX (Windows / DaVinci Resolve)
- Uncompressed H.265 / HEVC (bitrate of 80–120Mbps minimum for 4K recommended)
2. Step-by-Step Production Sequence
The production process for upscaling and rendering your video assets is as follows:
1. Source Video Audit & Artifact Inspection
- Watch your raw footage (720p or 1080p) at 200% magnification and analyse what the main quality issue is- does it concern pixelation, face clarity, or compression noise?
2. Configure AI Model & Sharpening Sliders
- Import clip into upscaler you like(Topaz Video AI, Video2X, or ComfyUI) Choose 4K(3840 x 2160) For sharpeness, set low to avoid overly sharp, artificially-ringed edges.
3. Render a 2-Second Test Preview
- Create a 2-second loop of your clip’s highest detail level (e. G. Human faces/action backgrounds) and render to a short preview file first. Check to ensure skin tones are coming through naturally.
4. Execute Full Render to Master Codec
- Batch Render the entire clip sequence with a ProRes 422 HQ or H.265 container with high bitrate (100Mbps +).
5. Final Timeline Assembly & Color Grading
- You will need to bring the downscaled 4K master into your video editing program (DaVinci Resolve or CapCut). You can do this by adding a small film grain overlay (2-3% opacity) so that the details will look smooth when put together.
AI Video Upscaling Engine Comparison
Upscaling Pipeline Comparison · Native Technologies, Max Output Resolutions & Processing Environments
| Tool / Pipeline | Native Upscale Tech | Max Output Resolution | Processing Environment |
|---|---|---|---|
| Topaz Video AI (v5 / Astra) | Deep Tensor Model (Astra/Iris/Proteus) | Up to 8K / 16K | Local Desktop / Cloud |
| Video2X (Open-Source) | Real-ESRGAN / Waifu2x Engine | 4K Native | Local Vulkan GPU / Google Colab |
| ComfyUI (ControlNet Tile) | Latent Tile Diffusion Denoising | Dynamic (4K+) | Private Local GPU (NVIDIA 16GB+) |
| DaVinci Resolve Studio | Super Scale Neural Engine | 4K / 8K Master | NLE Finishing Suite |
Request A Custom AI Video
Tell us what you're trying to create and we'll point you to the right tool — or help you set it up.
3. Advanced Upscaling Architectures: ComfyUI Tile Denoising
For maximum control over generated details, open-source developers bypass commercial GUI tools and build custom node trees using ComfyUI, ControlNet Tile, and Ultimate SD/Ultimate SD Upscale:
- [Raw 720p Render] ➔ [VAE Encode] ➔ [Tile ControlNet + Sampler (Denoise 0.35)] ➔ [VAE Decode (4K Master)]
The Node Pipeline Logic:
- VAE Encoding: The raw 720p MP4 frames are decoded into latent tensor space (X, Y, T).
- ControlNet Tile Conditioning: The ControlNet Tile Model evaluates the original low-res frame to constrain pixel geometry, preventing the AI from changing subject shapes or facial features.
- Latent Tile Denoising (0.30 - 0.40): The picture is cuts into smaller overlapping segments and re-sampled. The requirement of having the denoising strength between 0.30 and 0.40 compels the model to create high-frequency details (skin pores, fabric patterns, hair) while at the same time not changing the basic composition of the image scenes.
- VAE Tile Decoding: Using texture blending methods the tiles are merged back into a single image thereby resulting in 3840 x 2160 image series.
4. Resolving Upscaling Artifacts ("Waxy Skin" & Halos)
Over-processing AI video can introduce noticeable visual defects. Here’s how you can fix them in your rendering process:
- Removing Plastic Skin Effect: Too much AI noise removal removes realistic texture and makes faces appear plastic-like. Restoring some texture should be done by adjusting your upscaler’s Add Grain / Noise settings to between 1.5% - 3.0%.
- Fixing High-Contrast Edge Halos: Setting the sharpening slider too high creates glowing white outlines around high-contrast edges. Keep sharpening parameters below +20, and use a secondary Unsharp Mask in your NLE with a wide radius (2.0px) and low opacity (15\%).
- Smoothing Optical Flow Artifacts: High-speed motion can cause frame interpolation models (like Chronos or RIFE) to warp background pixels. If background warping occurs, switch from Optical Flow interpolation back to Nearest Neighbor / Duplication for high-motion scenes.
5. Master Codec & Bitrate Export Specifications
To preserve upscaled details during final export, configure your renderer using these professional encoding targets:
- [4K Canvas Upscaled]➔[ProRes 422 HQ / DNxHR HQX]➔[Final Edit Cut]➔[Web Target Bitrate: 80-120Mbps]
- Intermediate Master Codec: Export for production with Apple ProRes 422 HQ (macOS) or Avid DNxHR HQX (Windows). Both these intra-frame codecs maintain that independence, storing individual frames uncompressed, retaining as much detail as possible during color grading.
- Final Web Master Codec (H.265 / HEVC): Make it into. Mp4 using H.265 / HEVC container 4K 30 Fps: The target bit rate can be from 80 to 100 Mbps 4K 60 Fps: Target bit rate can be from 120 to 150 Mbps.
4K AI Video Upscaling Masterclass
Master spatial super-resolution, temporal interpolation, bitrates, noise reduction, and artifact repair.
Generating raw video frames at native 4K (3840x2160) directly out of diffusion transformers requires immense VRAM memory and long rendering times. To keep generation fast and affordable, platforms output base drafts at 720p or 1080p. Dedicated upscaling engines use neural super-resolution models to reconstruct fine pixel textures, sharp edges, and film grain frame-by-frame without quality loss.
Traditional bicubic stretching simply stretches existing pixels across a larger resolution grid, resulting in blurry, soft video. AI Video Upscaling uses neural networks trained on millions of high-definition images to predict and synthesize missing detail—intelligently sharpening eyelashes, fabric textures, architectural lines, and lighting reflections.
For professional local desktop rendering, Topaz Video AI is the industry standard (featuring specialized models like Artemis and Proteus). For cloud-based workflows, Runway 4K Upscaler, CapCut AI Upscaler, and Krea AI offer fast, web-based super-resolution passes directly inside your browser.
Many raw AI video generators output low frame rates (around 16fps to 24fps), causing jerky or stuttered motion. Temporal Frame Interpolation (like RIFE or Apollo AI) analyzes existing frames and synthesizes brand-new intermediate frames between them, boosting stuttering footage to smooth 60fps high-frame-rate 4K playback.
Over-denoising during an upscaling pass flattens skin texture, making faces look artificial and waxy. To preserve natural realism, dampen the "Reduce Noise" parameter down to 10-20%, use face-recovery neural models (such as GFPGAN or CodeFormer), and re-introduce a subtle 1-3% film grain overlay during post-processing editor rendering.
Exporting at low bitrates ruins upscale quality by introducing blocky compression artifacts. When rendering master 4K MP4 exports (H.264 or H.265/HEVC), set your target bitrate to 45 Mbps to 68 Mbps for 30fps content, or 65 Mbps to 85 Mbps for 60fps content. For archival masters, use ProRes 422 HQ.
Always cut and sequence your rough video timeline first at low resolution. Upscaling full 4K clips consumes significant render credits and GPU processing power. By trimming out unwanted footage beforehand, you only expend compute power upscaling the exact frames that make it into your final video edit.
Upscaling magnifies existing visual flaws (like flickering light or morphing edges). Fix flickering by running a Deflicker Pass inside your editor (or using Topaz Temporal Consistency filters) before running super-resolution passes, ensuring lighting levels remain stable across consecutive video frames.
To run local desktop video upscaling software smoothly, you need an NVIDIA RTX GPU with at least 12GB of VRAM (e.g., RTX 4070 or higher), 32GB of system RAM, and a fast NVMe SSD. If your local system lacks dedicated GPU acceleration, use web-based cloud upscaling services (like Runway or Krea) to process renders offsite.
Follow this proven 3-Step Upscaling Pipeline: First, generate your raw scene clips at 720p/1080p draft resolution and assemble your final cut inside your video editor. Second, pass the locked video export through a dedicated neural upscaler (Topaz Video AI or Runway) using 2x or 4x spatial enlargement and frame interpolation to reach 60fps 4K. Third, perform a final color-grading pass in your editor, re-introduce a 1% fine grain pass, and export your master video file at 50+ Mbps.
Ready to try Skora AI?
Transform your ideas into cinematic video in seconds.