
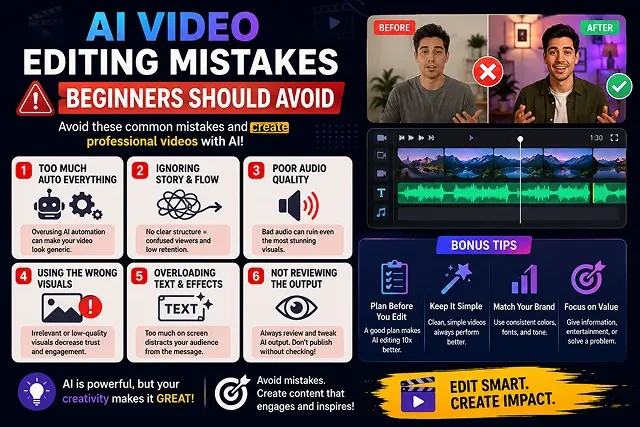
Innovative AI video creation tools like Kling 3.0, Sora 2, Runway Gen-4, and CapCut have ensured that creating videos is now easy for everyone. Moreover, unedited AI output can result in weak engagement rates, aesthetic problems, and issues with monetization as well.
Keeping these typical newbie mistakes at bay will allow you to create professional video content that is appealing and can easily generate income.
Above-the-Fold Feature Matrix: Traditional Scripting vs. AI Dual-Track Scripting
Scripting Framework Matrix · Human Crew Workflows vs. AI-Optimized Pipelines
| Scripting Dimension | Traditional Scriptwriting (Human Crew) | AI-Optimized Dual-Track Scriptwriting |
|---|---|---|
| Primary Output Goal | Guides human speech, acting, & emotional subtext | Directs visual prompts, audio visemes, & physics engines simultaneously |
| Visual Direction Format | Separate shot lists, storyboards, or director notes | Embedded 4-part prompt cues linked directly to dialogue blocks |
| Target Pacing Standard | 150–180 words per minute (Variable actor read) | Strict 120–140 words per minute (Prevents AI voice clipping) |
| Punctuation Function | Grammatical structure for silent reading | Acoustic timing cues (Commas = breath, periods = hard pauses) |
| Subject Consistency | Actors maintain physical features naturally | Requires explicit visual anchors per scene block |
8 Critical AI Video Editing to Avoid
1. Placing Unedited Output from AI Produce into the Market
- Using one-click prompt-to-video applications without any changes will usually yield poor results due to awkward cuts, robotic pacing, and beauty glitches. AI-generated content is good for producing the initial assets, but editing phase is done by humans anyway.
2. Overusing Prompts May Generate Errors
- When the currently-generated requests become too long and complicated (e.g. "A person is walking through a room, opening a door, sitting on the chair and sipping coffee), the AI engine gets overloaded. Consequently, unwanted artifacts may appear such as distorted hands or faces. Limit each generated clip to only one tiny movement.
3. Ignoring Character and Scene Continuity ("Visual Drift")
- Creating separate video clips without a cohesive style anchor leads to significant shifts in an actor’s face, garments, and background lighting from one clip to another. Use Global Style Anchors (such as “35mm still photography, warm lighting while using 3200K, or slate grey color”) or Image-to-Video (I2V) input to ensure that the video’s artistic consistency is upheld.
4. Dependence on Flat, Monotonous AI Narration
- Using default, unadjusted text-to-speech voiceovers with flat inflection causes audience retention to drop quickly. Adjust stability parameters (40%–50%), fine-tune pitch settings, or insert SSML pause tags to make synthetic voices sound natural.
5. Neglecting Audio Ducking and Sound Design
- Placing a raw voiceover over loud background music makes dialogue hard to hear on mobile devices. Always apply Sidechain Audio Ducking to automatically lower background music by -16dB to -20dB whenever speech is active.
6. Using Wrong Aspect Ratios and Positioning Text WronglyР
- Updating a landscape video (16:9) into a portrait version (9:16) usually implies that it will miss certain important visual features. Create video materials in the format you need and don’t forget to keep the auto-captions away from the interfaces of social networks.
7. Too Much Dependence on Low-Quality AI Stock Vectors
- When you depend only on generic AI 2D stock video clips, your content loses its aesthetic value and becomes repetitive. Try to combine synthetic B-roll with live-action video recording, authentic product videos, or custom graphics to enhance the effectiveness of your videos.
8. Ignoring Monetization & Copyright Guidelines
- Creating a mass-produced AI slideshow and not editing it falls under the YouTube's Reused & Repetitive Content Policy as well as Google AdSense guidelines, prohibiting monetization of the content.
Comparing Amateur vs. Professional AI Editing Workflows
Workflow Optimization Matrix · Amateur Workflows vs. Monetizable Professional Pipelines
| Editing Vector | Amateur AI Workflow (Triggers Penalties) | Professional AI Pipeline (Monetizable) |
|---|---|---|
| Asset Generation | Single-prompt automated video output. | Multi-prompt micro-shots with style anchors. |
| Character Control | Random faces and morphing features. | Reference-locked image-to-video (I2V) assets. |
| Audio Mixing | Loud background music covering flat AI audio. | Multi-track sidechain ducking & vocal EQ. |
| Text & Subtitles | Hard-to-read default captions over UI elements. | Kinetic captions positioned in safe viewing zones. |
| Editorial Curation | Raw, unedited video uploads. | Human-in-the-loop trimming & color matching. |
Request A Custom AI Video
Tell us what you're trying to create and we'll point you to the right tool — or help you set it up.
The 5-Step Professional Editing Sequence
Follow this workflow to assemble clear, monetizable AI videos:
1. Clean Up The B-Roll And Remove Artifacts
- I’ve imported the clips I made from your video editing software like the DaVinci Resolve download or CapCut desktop app and trimmed out the first and last half-second of each clip to clear out render issues and motion capture artifacts.
2. Lock Dialogue Pacing & Strip Silence
- Import your voiceover audio track. Delete silent gaps of over 0.5 secs and trim all filler sounds for a snappy, speedy narrative.
3. Match Color Grading and LUTs
- Assign a single LUT or color grade to the synthetic B-roll to match your keyframe and lighting.
4. Apply Sidechain Ducking & Transition SFX
- Bring down background music by -18dB when there’s speech. Intersperse subtle sound effects (whooshes, risers, ui clicks) on the cuts to keep the viewers glued.
5. Overlay Kinetic Captions & Export Master
- Add high-contrast auto-captions centered within safe margins. Export video as 1080p Full HD at 30 FPS.
Deep Dive: The Top 8 AI Editing Glitches & Technical Fixes
1. Spatial-Temporal Attention Decay ("Melting Pixels")
- The Root Cause: Writing long prompt strings forces the Diffusion Transformer's temporal layers (Z-axis) to process too many vector changes per frame timestep.
- The Technical Fix: Keep the motion parameters (motion_scale or motion_bucket) at a maximum of 0.3 – 0.4; stick to one action in your generation, and break down multi-step scenes into individual moments of 3 seconds of generation, using transition techniques like jump cuts and cross fades in your NLE.
2. Character Drift & Feature Warping
- The Root Cause: Pure text-to-video (T2V) generation lacks structural spatial anchor pixels, causing character faces, hair textures, and clothing to shift across visual cuts.
- The Technical Fix: Use Image-to-Video (I2V) conditioning with ControlNet / IP-Adapter spatial locking. Supply a ground-truth keyframe image and use text prompts strictly for camera trajectories (e.g., "slow tracking pan along X-axis").
[Ground-Truth Image Keyframe] ──┐
                                ├──► [IP-Adapter Spatial Conditioning Pass] ──► [Unified Video Output]
[Motion-Vector Text Prompt]   ──┘
3. Digital Phasing & Metallic Sounds in Synthetic Sound
- The Root Cause: The main issue is the usage of advanced-level compression neural encoding devices (e.g., HiFi-GAN) that lead to artificial high-frequency resonances, particularly in between the frequencies of 8kHz and 12kHz.
- The Technical Fix: Set up a steep parametric notch at 9.6kHz (at a high Q of 8.0). Place a parametric multi-band de-esser just beyond this on frequency set to catch peaky sibilants on 6.2kHz.
- [Raw Synthetic Voice] ➔ [High-Pass Filter (80Hz)] ➔ [Parametric Notch Filter (9.6kHz, Q=8)] ➔ [De-Esser (6.2kHz)] ➔ [Master Voice Stem]
4. Frequency Masking (Un-Ducked Background Audio)
- The Root Cause: Voiceover frequencies (300Hz - 3.5kHz) conflict directly with background music instrumentation, obscuring spoken dialogue.
- The Technical Fix: Configure an dynamic equalizer or compressor with Sidechain Routing. Set the compressor threshold to drop background music gain by -16dB to -20dB instantly whenever speech signal passes the trigger gate.
5. Color-Space Inconsistency Across Synthetic Passes
- The Root Cause: Every AI diffusion render bakes in its own arbitrary white balance and exposure curve based on initial latent noise seeds.
- The Technical Fix: Conform all raw AI clips to a unified working space (such as ACEScc or Rec.709). Use NLE neural match tools to lock shadow density and highlight curves to your hero master shot.
6. Frame-Rate Jitter & Missing Motion Blur
- The Root Cause: AI video algorithms make sharp distinct frames without adding the naturally occurring motion blur of shutter speed.
- The Technical Fix: Use an optical flow motion blur plug-in to include blur— like RE:Vision Effects ReelSmart Motion Blur— in raw clips with a fixed shutter angle of 180 degrees.
7. Kinetic Caption UI Trapping
- The Root Cause: Putting video subtitles in the upper or lower areas of vision leads to blockage due to the appearance of TikTok or Reels interface icons.
- The Technical Fix: Use only the Middle Third Safe Zone as a place for subtitles (mean positions at 35-65% of the Y scale).
8. Programmatic Repetitive Content Strikes
- The Root Cause: Uploading identical visual templates with micro-variations in text triggers automated platform filters for low-value auto-generated content.
- The Technical Fix: Introduce manual human editorial passes: re-arrange scene pacing, apply custom color grades, record original audio introductions, and include primary commentary.
AI Video Editing Pitfalls to Avoid
Master clean rendering, eliminate visual artifacts, balance audio tracks, and maintain brand consistency.
The biggest mistake is relying on 100% automated one-click generation without a human review pass. AI video tools frequently produce minor visual glitches, mispronounce technical terms, make subtle caption typos, or make odd stock footage choices. Skipping a quick human editing pass leads to generic content that hurts viewer retention and brand credibility.
Visual drift happens when you generate clips using only text prompts. To maintain consistent character identity, switch to an Image-to-Video workflow. Generate a high-resolution base portrait first and pass it into your video generator as a reference. Additionally, reuse identical character descriptors (hair style, outfit, facial features) in every scene prompt.
Setting the motion slider to maximum forces the AI diffusion engine to predict extreme pixel displacement between frames, often tearing object edges apart. For clean, artifact-free renders, keep your motion intensity slider set to a moderate level (3 to 5 out of 10) and describe steady, single-direction movements (like a slow camera dolly or head turn).
When background music plays at the same volume level as the spoken dialogue, the video becomes noisy and difficult to follow. Always enable Audio Ducking in your timeline editor. This automatically lowers the background music track by -12dB to -18dB whenever speech is active, ensuring your narration remains clear and prominent.
Default subtitle tools often output large multiline text blocks that block critical visual elements or display upcoming words too early. Fix this by limiting captions to 1-3 words on screen at a time, placing them in the middle-lower third of the canvas, and manually reviewing line breaks to fix misspelled brand names or technical jargon.
Robotic delivery happens when script text lacks natural phrasing or stability settings are left at 100%. In tools like ElevenLabs, lower the stability slider to 50-60% to allow natural pitch variation. Format your script with punctuation (dashes, commas, ellipses) to create realistic pauses, or add emotion tags (like *curious* or *excited*) to guide tone.
Holding a single AI-generated visual or avatar shot for longer than 4 to 5 seconds causes viewer focus to drop rapidly. Maintain engagement by changing or modifying the visual element every 2 to 3 seconds. Alternate between close-ups, wide B-roll shots, kinetic text callouts, and subtle zoom movements to keep the viewer attentive.
Uploading 16:9 widescreen videos to mobile feeds (like TikTok or Shorts) creates ugly black pillarboxes and cuts on-screen presence in half. Always set canvas dimensions before rendering assets: choose 9:16 vertical (1080x1920) for social feeds, and reserve 16:9 widescreen (1920x1080) for traditional YouTube or website landing pages.
Major platforms enforce C2PA provenance tracking rules. Failing to check the "Altered or Synthetic Content" flag during upload can result in your video being suppressed by feed algorithms, stripped of monetization rights, or removed for platform policy violations. Disclosing synthetic content ensures full compliance and protects account standing.
Follow this 3-Step Pre-Flight Review Pass: First, review visual frames to eliminate any AI artifacts (like extra fingers, morphing backgrounds, or soft faces). Second, check audio levels to ensure voice narration stays clear above background music using audio ducking. Third, proofread auto-captions for spelling errors and confirm your canvas aspect ratio matches your target distribution feed.
Ready to try Skora AI?
Transform your ideas into cinematic video in seconds.